When configuring Idealpos for Tenerum Payment Systems EFTPOS, the following steps need to be completed in the below order for each terminal that you are installing a Tenerum Payment Systems Payment Terminal.
Click on each step below for further details:
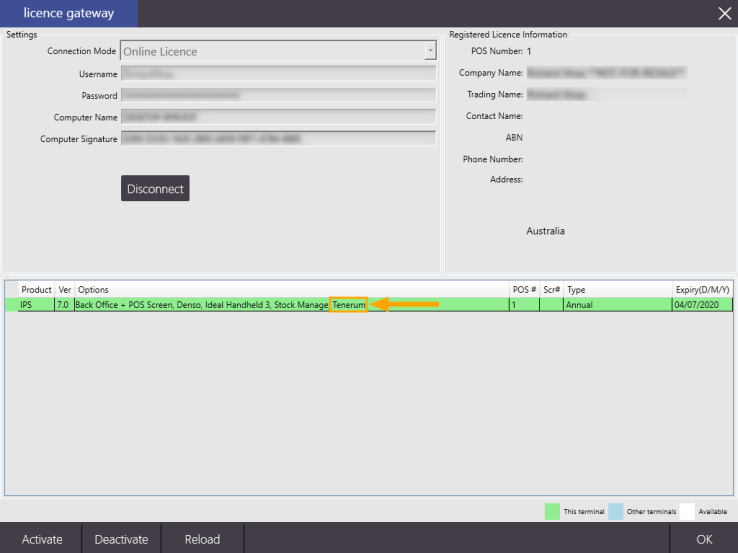
You will need to ensure that Tenerum has been enabled in the Licence Gateway.
Go to: Setup > Licence Gateway
Any modules licensed for the current terminal will be displayed in the green area.
If you have been licensed for Tenerum, Tenerum will appear under the Options column.
If Tenerum does not appear in the Licence Gateway, please contact us and speak to Sales who will be able to organise your Licence for Tenerum.
Once the Tenerum module has been added to your licence, you will need to open the Licence Gateway window and press the "Reload" button on the bottom left-corner of the Licence Gateway window. This will obtain/download the latest licence details from Idealpos. Once this has been done, Tenerum should appear as per the below image.
Press OK, then completely restart Idealpos for the licence to take effect.
Idealpos can be closed via the IPS Utils (Start > Idealpos > IPSUtils) > press the "Close" button which will close the Idealpos suite.
Idealpos can then be started via the Desktop shortcut or via the Start Menu (Start > Idealpos > Idealpos).
The Payment Terminal will require two connections, the first being a connection to power, and the second connection being an Ethernet connection to the network.
Ensure that you have the above connections available at/near each POS terminal which will be associated with a Tenerum Payment Terminal.
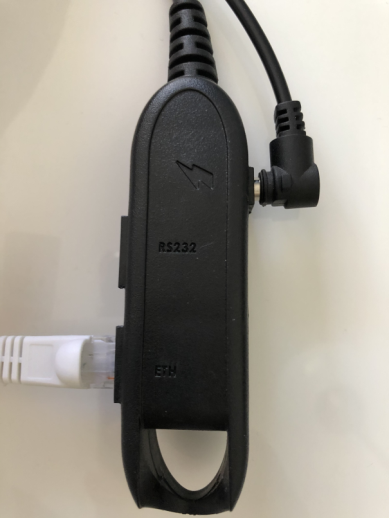
The Payment Terminal will contain a single cable protruding from the device which ends with a connection hub which contains ports for Power, RS232 and Ethernet.
To connect the Tenerum Payment Terminal to an Idealpos terminal, we will be using Power and Ethernet.
Connect a network cable (CAT5 or CAT6) to the ETH port (Ethernet) and connect the supplied power adapter to the power socket.
After connecting the Payment Terminal to power, it should power on shortly afterwards.
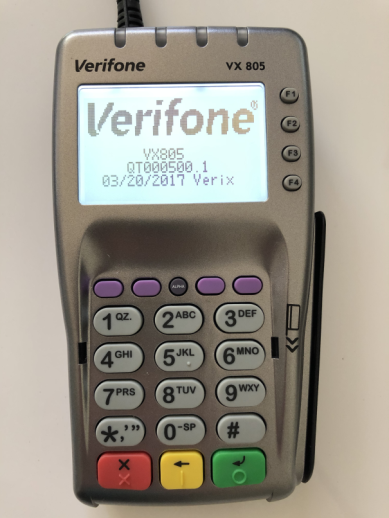
Whilst the Payment Terminal starts, a loading screen may appear as per the below example along with numerous messages.
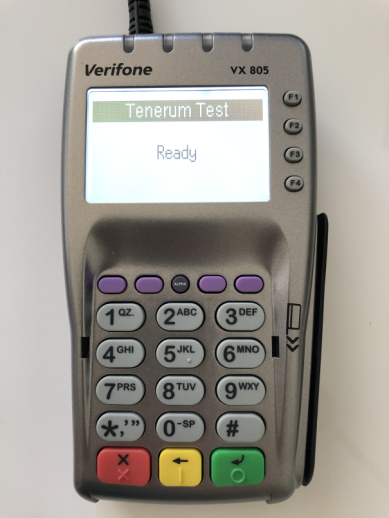
Once the Payment Terminal has completed the power on startup process, it will display a Ready message which indicates that it is ready for accepting payments.
By default, the terminal will automatically retrieve an IP address via DHCP.
If DHCP is not suitable for your environment, this can be changed by performing specific steps on the Payment Terminal - as this is outside the scope of the Idealpos Configuration, please contact Tenerum for more details about setting a static IP address on your Payment Terminal.
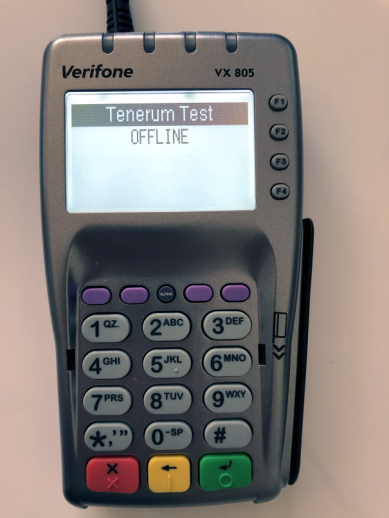
If there are connectivity issues with the Payment Terminal, the terminal screen will display OFFLINE as per the below example.
Please ensure that your Payment Terminal is connected to the Ethernet connection and there is network connectivity via the network connection.
Once network connectivity has been resolved, the Payment Terminal will display a Ready prompt as per the example further above.
Once the Payment Terminal is online and is in a Ready state as per the previous step, you can enter settings into Idealpos to enable communication.
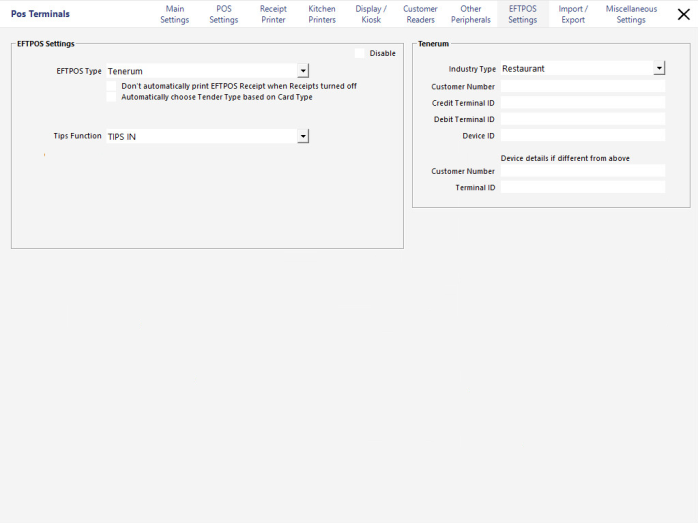
Go to: Setup > POS Terminals > Select POS Terminal > Modify > EFTPOS Settings
Select "Tenerum" from the EFTPOS Type dropdown box, then enter the settings as supplied by Tenerum:
Device details if different from above are optional:
Ensure that the Tips Function is linked to the Received Account function used for Tips.
This can be set by going to Setup > Function Descriptors > Received Account 1 to Received Account 4.
There are four available slots for Received Account, any one of which can be set as the Tips In function.
From the Function Descriptors screen, simply select a Received Account function and enter "Tips In" into the description.
Then ensure that this Received Account option is selected in the Tips Function dropdown box when configuring Tenerum in the Idealpos EFTPOS Settings configuration below.
Close the POS Terminals configuration windows to save the change.
The next step involves checking and setting the Function Descriptor/Tender for completing Tenerum Payments.
There are two parts to this which include setting up a Function Descriptor for Tenerum and ensuring that the Tender is enabled in Yes/No Options.
Go to: Setup > Function Descriptors.
Note that your system may already have a Function Descriptor configured for Electronic Funds Transfer (EFTPOS) if your system was previously setup with a different Payment provider.
Examples of Payment Provider descriptions may include EFTPOS, Credit Card, Master Card, etc. Terminology/descriptions used for Electronic Funds Transfer may vary depending on the jurisdiction that you reside in or the previous Payment Provider that was configured on your system.
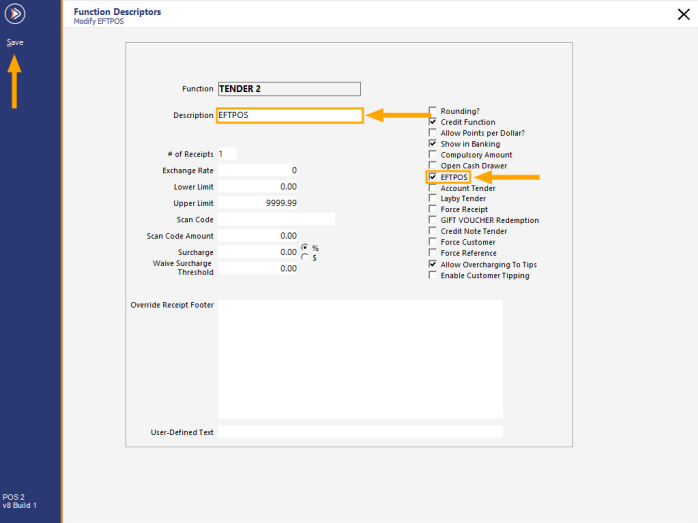
If any of the above Function Descriptor examples exist in your system and you want to use them for Tenerum, select the Function Descriptor from the list and press the "Modify" button on the bottom-right corner of the window.
Alternatively, select the next unused Function Descriptor from the list and press the "Modify" button on the bottom-right corner of the window.
Unused/available Function Descriptors are typically labelled "TENDER XX" (where XX indicates the number of the unused tender).
When setting up the Tender, ensure that the EFTPOS Checkbox is enabled - by enabling this checkbox, Idealpos will treat the tender as an integrated tender when paying using Tenerum.
Integrated Payment Tenders in Idealpos simply means that the amount due for payment is sent to the Payment Terminal so that the Clerk operating the terminal doesn't need to manually enter the amount in the Payment Terminal.
Any other options can be configured as required.
You may also want to refer to the Function Descriptors topic in the User Guide for further details about the available functions on this screen.
As an additional step, you may want to include additional details to be printed on the receipt footer for tipping purposes.
E.g. Idealpos can be configured to print two receipts - a copy for the venue and another for the Customer.
On the receipt footer, you can include suggested gratuity tip amounts and also include a section for the customer to write their tip amount.
The Suggested Tip Amounts will be printed on the receipt footer as a percentage of the total amount, simplifying the tipping process.
When the Customer pays for their order, two receipts will be printed, one for the Customer, another for the venue.
The Customer will write their tip amount in the tip section of the receipt footer, and the venue can then retain the receipt for entering tips at a later time (see Capturing Tips for more details about this process).
To utilise this function, you will need to configure Suggested Amounts in the Gratuity Text Function Descriptor.
Read more about configuring Gratuity Text Suggested Amounts here.
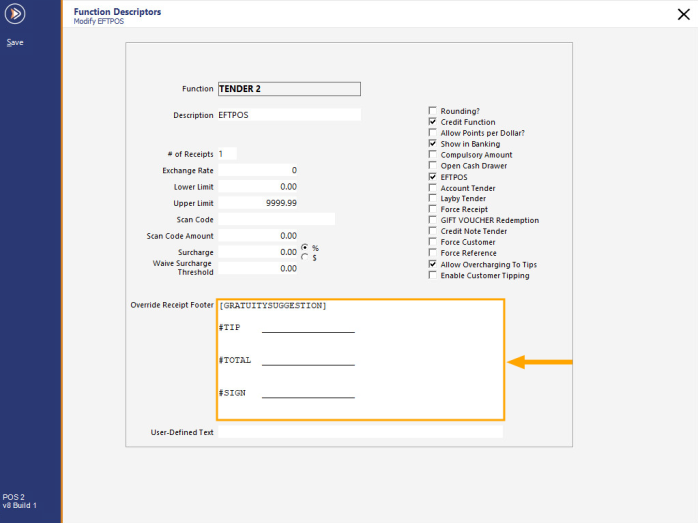
Once the Suggested Amounts have been configured in the "Gratuity Text" Function Descriptor, the Receipt Footer can be configured as follows to include these suggested amounts.
In the Override Receipt Footer field, enter the following text:
[GRATUITYSUGGESTION]
#TIP ____________
#TOTAL ____________
#SIGN ____________
To print two receipts for every receipt, set the value in the "# of Receipts" field to "2".
Once the Function Descriptor has been configured, close the Function Descriptors windows.
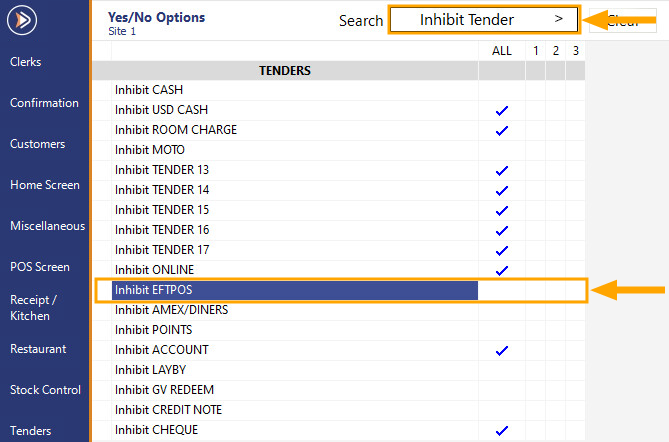
Then go to: Setup > Yes/No Options > Tenders.
Enter Keyword Search: Inhibit Tender.
Then ensure that the Function Descriptor configured in the previous step is unchecked.
Ticked=Tender is Inhibited/Hidden from the Tender screen
Unticked=Tender is allowed/displayed on the Tender screen
If you want all POS Terminals to have access to this tender, ensure that All is unticked.
If you want to restrict the tender to specific POS Terminals, place a tick into the POS Terminal Number columns that you want the tender hidden.
The Tenerum Payment Integration requires additional buttons on the POS Screen so that the following functions can be performed:
To add/modify buttons on the POS Screen, ensure that the POS Screen is closed, then from the Back Office Dashboard, go to:
Setup > POS Screen > POS Screen Setup > Select the POS Screen Layout > Buttons.
At the bottom of the POS Screen, select a suitable POS Screen tab to create the buttons for the above functions (Settlement Batch Close, Settlement Inquiry and Capture Authorisations). Note that you don't need to create these buttons on the same POS Screen tab, however, it may be beneficial to keep all buttons related to EFTPOS functions together for added simplicity.
For the purpose of this exercise, we will place the buttons on the MANAGER tab.
Select a blank button on your chosen tab,
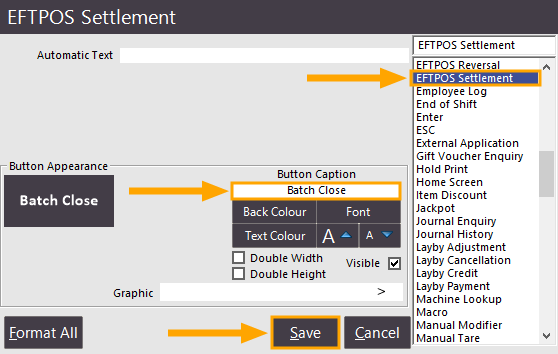
The first button will be used for the Batch Close/Settlement function.
Create the Settlement/Batch Close button as follows, then press "Save" to save the change.
The button appearance (including Button Caption) can be customised as required.
However, ensure that the correct function (EFTPOS Settlement) has been selected from the Function List.
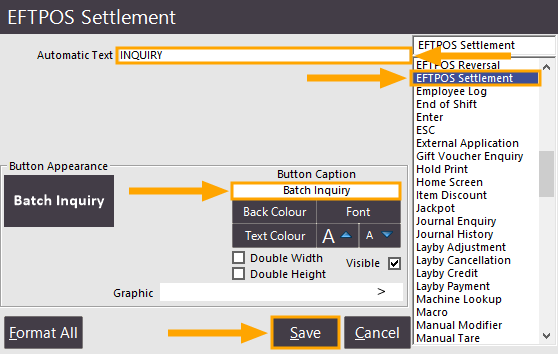
The second button created will be for the Settlement (Inquiry) function.
Create the Settlement/Inquiry button as follows, then press "Save" to save the change.
The button appearance (including Button Caption) can be customised as required.
However, ensure that the correct function (EFTPOS Settlement) is selected.
Also ensure that "INQUIRY" has been entered into the Automatic Text field.
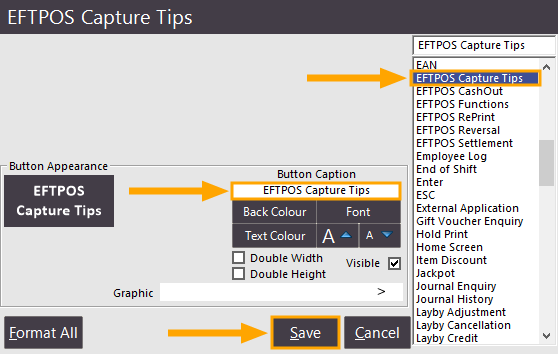
The third and final button created will be for the Capture Tips function.
This button will be used to Capture Tips/Authorisations post-transaction.
Create the Capture Tips button as follows, then press "Save" to save the change.
The button appearance (including Button Caption) can be customised as required.
However, ensure that the correct function (EFTPOS Capture Tips) is selected.
Once the buttons have been created, close the POS Screen Layout windows.
The Tenerum EFTPOS Integration will use the printer that's configured in Idealpos for the POS Terminal.
When Idealpos prints out a receipt for a sale that has been paid for using the Tenerum EFTPOS Integration, the sale receipt will include the details from the EFTPOS transaction (i.e. Transaction Approved, the EFTPOS amount, the masked card number and any other ID numbers processed by the EFTPOS terminal).
The printer configuration will vary depending on the type of printer you are using and the interface used (e.g. USB, Ethernet, etc.) to connect the printer to the POS Terminal.
Refer to the Network Printers section in the User Guide for more details on setting up a printer.
To ensure that all settings have been applied, we recommend restarting Idealpos on your terminals.
Go to: Start > Idealpos > IPSUtils
Enable checkbox "Close IPS Utility" then press the "Close" button and confirm the prompt.
Start Idealpos either via the Desktop Shortcut or by going to Start > Idealpos > Idealpos